

At Holmes Agro we are happy to partner with A & L Canada Laboratories Inc. to bring a customized soil test to our growers. Every soil test we submit will show results for the following:

At Holmes Agro we are happy to partner with A & L Canada Laboratories Inc. to bring a customized soil test to our growers. Every soil test we submit will show results for the following:


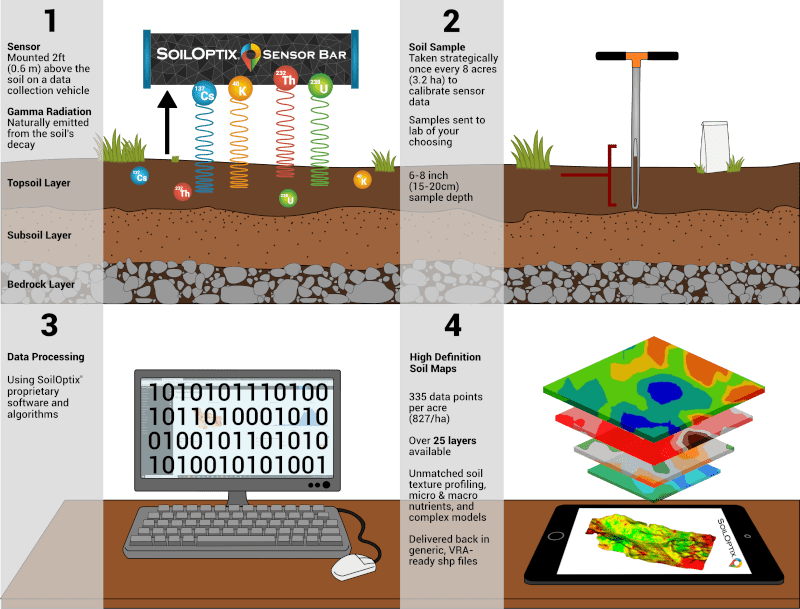
At minimum all you need is a plastic bag and garden trowel. Please read the following reference guide to learn more in-depth of how to do your own soil sampling.
At minimum all you need is a plastic bag and garden trowel. Please read the following reference guide to learn more in-depth of how to do your own soil sampling.
We also offer manure & compost testing to help growers better understand the nutrient credit their manure or compost offers for crop planning. All analyses are done through our partner A&L Canada Laboratories Inc. Every test we submit will show results for minimum the following (more in-depth tests can be done as well):

We also offer manure & compost testing to help growers better understand the nutrient credit their manure or compost offers for crop planning. All analyses are done through our partner A&L Canada Laboratories Inc. Every test we submit will show results for minimum the following (more in-depth tests can be done as well):
We also offer manure & compost testing to help growers better understand the nutrient credit their manure or compost offers for crop planning. All analyses are done through our partner A&L Canada Laboratories Inc. Every test we submit will show results for minimum the following (more in-depth tests can be done as well):
We also offer manure & compost testing to help growers better understand the nutrient credit their manure or compost offers for crop planning. All analyses are done through our partner A&L Canada Laboratories Inc. Every test we submit will show results for minimum the following (more in-depth tests can be done as well):